Showing posts with label yarn braids. Show all posts

Tuesday, October 11, 2011

Oh where, oh where has Katie gone???

Enjoying some truly gorgeous fall weather in Michigan!

Oh man friends!  I seem to have disappeared again after a pretty good streak of regular posts.  Well, we are in the eye of the hurricane around here, otherwise known as fall soccer season!  

I am SO glad that Miss V is sporting those yarn braids right now, because we just have not had time for hair.  A few weekends ago I did change the piggyback braids in the front into more box braids, but it was a pretty quick process thankfully.

Here are a few pictures to show you what life has been like the last few weeks:
The Young Man on his club soccer team

The Young Man on his Middle School soccer team
Miss B on her club soccer team
Little E working on her soccer moves!
Let's throw in some hair pics.  I thought V's yarn braids looked great with this red headband, and Miss V (for reasons unknown) LOVES to wear headbands!


And here is a pic after we took out the piggy back braids.  The front is pulled back in a half pony, but you can kind of see the new braids.


We still have a week and a half until I take out the yarn braids and put in something new.  I have a bunch of cool ideas spinning in my head!  So if you can be a bit patient with me, I promise I will be back to posting when the hurricane has died down.

Katie

Wednesday, September 7, 2011

Back to School 2011 - V's Hair

We seem to have fallen into a pattern of giving V yarn braids every fall.  She did not have them for the first day of school last year, but we did them shortly after.  I really only like to do yarn braids once a year for several reasons.  1) they take a long time to put in 2) I leave them in a long time -which is both awesome and boring 3) I just like variety so once a year makes it exciting every time she gets them!  

This year I decided to basically repeat the fall inspired colors I did last year because I REALLY loved that style, but I HAD to make some changes.  I NEVER do any style exactly the same way twice!  I will be referring to last years braids all the way through, and I won't be explaining much about how I did the style so you should check last years post before reading this one!


Change 1-  I added Red yarn.  I was going to use this last year but thought it was too bright.  This year I was ok with it!  So we had black, brown, burgundy and red.

Change 2 - No beads.  The beads were great last year, but again I like change, and it is easier to get the hair into ponytails and other styles without a clump of beads on the ends.


Change 3 - I went for longer braids.  These are the longest we have ever done.

Change 4 -We did a layered look instead of a blunt cut look.  I usually try to have all braids the same length at the bottom, so for a change I tried layers.  I am not sure it is as cool looking as I envisioned, but to achieve this look I just made the bottom rows really long and then with the rows after that I made them a bit shorter each time.


Change 5 - We did piggy back braids on top.  Last year we had criss cross cornrows.  Again, I will leave these in for a few weeks and then take them out and put more yarn braids on top while leaving the back as it is.


Change 6 - I also kind of changed the pattern in which I put in the different colors of yarn.  This time I did the colors row by row from the bottom up.  I did two black rows on the bottom and than did a burgundy row, a brown row, a red row, and back to black etc.


I think that covers all the changes.  I made some little braided yarn pieces to use as hair accessories on the pigtails.  I kind of liked them, but I got sick of them and took them out after a few days.


Lastly, if you don't know how to do piggy back braid, here is one of our original videos on how to do them!  They are a great alternative for those who can't do cornrows.  Notice that B is the hair model in this video - before locs!


Katie

Monday, February 14, 2011

V Day at the G House

Hi all! Wow I haven't posted to you all in a while. I miss you guys! I very suddenly moved about a half mile away, but my apartment was extremely unprepared to be moved, so it was pretty hectic. It was a good move, we like the new place a lot, and we have a yard for the dog, which is super important!

Anyway, I spent several days prior to Valentine's day tightening G's locs and putting in her Valentine's day style. We also went with yarn. Ours was a variegated yarn, pink and red. I used this yarn a long time ago on a trip to Haiti, I gave her faux yarn ponytails. There was also some rainbow variegated braided into the pink that time.


When G saw Katie's style on V, with the pink yarn hanging down with all the beads, she wanted something similar. I was happy to oblige as I miss doing the crazy fun styles! I have not yet figured out a way to "weave" in the yarn to the locs and seamlessly transition all of it into ponytails. The last time I did the yarn fall...

I hid her bun of locs at the base of the ponytail, but it never quite looked exactly right....the locs are just too thick...the base of the ponytail is just unnaturally fat. So while I initially had visions of somehow figuring out how to morph the ends of all the locs into two ponytails, it didn't work. But I am GLAD it didn't, because what she ended up with, sort of Willow-Smith-Whip-My-Hair-esque knot/buns instead of ponytails, looks SO CUTE on her.

I used the long yarn twists with beads on the end which were going to be the faux ponytails as ties onto the buns so she could have some beads dangling to swing around. We only wore those on Sunday and Monday...now she just has the knots.

So here it is...


It was really very easy! All I did was box twists....9 locs per box (or a few more or less if some needed to be incorporated) and I plain-ole TIED the yarn onto two of the locs in the box before I started. I tied it in the center of the yarn so that two ends dangled down long. So I box twisted her whole head with one strand of yarn in each box. Tying the yarn on worked just fine and was so easy.

So then, I parted her hair for two ponytails (but intentionally crossed that front twist on the right over to the other side, as you can see in the middle photo). I gathered them all together, put in my elastic, cut all the extra long ends of yarn so that it was all about two inches longer than her actual hair....I braided the ponytails as best I could (they were not long enough to braid much, but the point was to make sure all the ends stayed together) and continued to braid that extra couple inches of yarn. Then I just tucked the ends of those braids under, and captured the yarn ends under the elastic on the bottom side of the ponytail. All I did after that was tie the beaded yarn twist ropes around it and let it hang!

If your child's ponytails are longer, you could probably braid or twist and then wrap the braid around maybe once or even twice into big knots. I think it looks just fabulous with all the pink twisted in there! The knots give a bit more mature look than ponytails.

I savored every minute of doing this style, and she got LOTS of compliments. I know, I know, it's OTT, but around here, her little girlfriends think its WAY cool.

Hope your Valentine's styles came out great! Share a photo with us on facebook!

Wednesday, November 24, 2010

Something like a basket weave....

Remember how I said I wanted to do a basket weave on V's yarn braids a few weeks ago?  Well, I almost forgot!  But I was reading an old post and was reminded by myself that I was going to try that out!

So I did, and the result was pretty, although maybe not looking exactly like a basket weave:


One of the most fun things about yarn braids is that I didn't need to use any kind of pony holder.  I just took a few braids from each side and tied a knot around the braids coming from either side of her head!


What do you think?  It sounds like a lot of you have been trying out the yarn braids.  Have you done anything interesting to style them?  We LOVE to see your pics!


Katie

Thursday, October 28, 2010

Braided Yarn Ponytails

G has been asking and asking for a new ponytail and I FINALLY got to finishing it! And JUST in time for her to now have long hair so she can sing "Whip My Hair" and "whip it real hard!" See the end of the video for a sample ;-)


The video walks you through how to install the ponytail once you have all the yarn braids done. To create the ponytail, basically, all you do is get your favorite yarn (it's most fun when you just let your child choose the color scheme. If you don't want it to be too insanely colored, choose black or very dark brown and then let your child choose what the accent color will be), decide how long you want the ponytail to be, then cut your strands TWICE as long (you'll be doubling it over). I try to vary the lengths of the braids a bit so that it hangs like a real ponytail (which would not have all strands the exact same length), Then braid away! Six strand braids work best, I think, otherwise you'll be braiding till you fall over. Nine would be ok too, they'll be a little thicker. I put some beads on the ends for weight, then just knot the yarn below the last bead. I leave some loose yarn hanging down like real hair would be. Once the ends of the ponytail start to get a little raggy at the ends of the strands of yarn, then you have some excess to trim off.

So, just make enough braids to suit your liking, till the ponytail is as full as you want it. If you are doing a ponytail on each side, like this:
make sure you do some extra.

Remember, though, all the braids will be folded over when you install them...

I will now let the video do the rest of the talking!


Monday, October 25, 2010

Fall Inspired Yarn Braids - Part 2

After 3 weeks of the half cornrow half yarn braid style we took out the cornrows on top, washed just that part of her hair, and finished her off with another 50 yarn braids this weekend! The end result is gorgeous and let me tell you, this girl LOVES yarn braids!


Had to add this pic with B in the Halloween headband we got from Target 

Yesterday at Young Man C's soccer game I was playing around with V's braids and made this fun little twisty, weavy type of style.  I didn't have any hair ties so I just used the braids to wrap around the end and tie a knot.  She slept in this style last night and wore it this way to school today, so we will see if it actually held up.  I wasn't trying to seriously style it, I was just playing around, but I thought it was really cute.  It inspired me to try doing a basket weave next.  So stay tuned for that.


And if V looks sad to you in this last picture it is because she was.  I am a very mean mom and I made her sit on the sidelines with me during the game instead of running around with her sister because she had made some poor choices.  Sorry V, but at least your hair looks cute!


Katie

Monday, October 4, 2010

Fall Inspired Yarn Braids


As you can see we have used three different colors of yarn.  I wanted to really make sure the colors were noticeable, but not over powering so, I still used a lot more black than I did brown and burgundy.  I used two strands of yarn for each braid so what I did for the braids with the brown and burgundy yarn was combine 1 piece of color yarn with 1 piece of black yarn.  Then I alternated like this: 1 all black, 1 half brown, 1 all black, 1 half burgundy, 1 all black, 1 half brown.....and so on.  I think I got the exact effect I was hoping for!


Originally I was also going to use red yarn, but once it was cut and lying out next to the other three colors it was just to bright.  I thought it would stick out like a sore thumb so I didn't use it.

Similarly, I had originally planned to use 5 beads per braid.  I ended up just using two shades of brown and one red bead.  But at first I also had a pearly orange and a warm yellow with them.  Again, I thought that was two bright and not quite the look I was going for, so I stuck with just 3 beads per braid.


I decided to go with a two step plan for these braids.  For the first 3-4 weeks it will be in this style - yarn braids in the back with Criss Cross Cornrows in the front.  I did add yarn to the ends of the cornrows so that they blend right in with the braids in the back.  They are just a bit thicker at the top.  After about 3 weeks, I will take out the cornrows and put the front into regular yarn braids and leave them in for another 3-4 weeks.  I did this last fall also and the braids in the back ended up being in for almost 8 weeks since I only changed the front, but they held up GREAT!  I am hoping for the same results this time around.


When I picked her up from school today she told me she got "like 100 compliments" on her hair today!

So these braids were inspired by my love of fall colors, but I was also inspired by one of our readers, Holly, who sent us these pretty yarn braid pictures awhile back.  I loved the colors in the first one, and I really liked the length of the braids (and the colors) in the second picture.  I tried to make V's braids a bit longer this time, but somehow they always seems to end up pretty close to the same length!


Katie

Wednesday, August 25, 2010

All About Yarn Braids

V on her 4th birthday!
We already have a two part video series about Yarn Braids in our video gallery which you can watch here.  (you have to scroll down the page quite a bit)  I made those videos several years ago - although I don't have much new information, I thought I would do a little written rundown for you all!  Let's do this in Question/Answer form...

Q:  Why would I want to put in yarn extensions?

A:  I feel like yarn braids give you a similar experience to locs, without the permanency of locs.  They are SO versatile.  Once you have a whole head of braids you can do whatever you want with them to change up the style daily: ponytail, pigtails, half up, you can even cornrow them!  You could get this same effect from doing a box braid style without adding yarn, but since the yarn braids have a lot of length and thickness to them, I feel like they are more versatile.  Also, if your child still has pretty short hair, it is fun to have the extra length that you can get from yarn braids.  Thirdly, they are a very long lasting style!  I only do yarn braids about once a year, but when I do, I love that I can leave them in for close to two months!

Q: Why use yarn for extensions instead of synthetic hair?

A:  I feel that yarn is much easier to use.  You only need two pieces of yarn per braid and you don't have to separate out a bunch of tiny little hairs.  That can be messy and frustrating!  Also, yarn is inexpensive and you can get it in almost any color you want!

Q:  What kind of yarn do you use?
A:  The important part is that you use ACRYLIC yarn.  The brand doesn't really matter.  It is also up to you what weight you use.  I like to use Medium (4).  For V I also like to use BLACK yarn because it matches her hair color so well.  You can only tell the difference between her hair and the yarn when you are looking up close.  But B has brown hair, so if I did this on her I might choose more of a deep brown color.  I have used red yarn at Christmas time and Pink/Purple yarn for a back to school look.  Both times I only used the colored yarn on some of the braids for fun.  I didn't give her a whole head of red hair!


For this style I only added the pink/purple yarn to the braids coming from the heart cornrows on top.  After 4 weeks, I removed the cornrows and put in more regular box braids with black yarn on top so she no longer had the colored yarn.  We left them in for another 4 weeks!


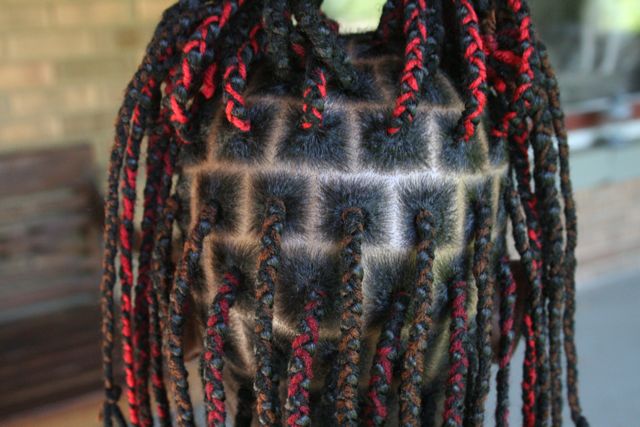
Sorry these are the best pics of the red yarn braids.  I only did 8 braids with the red yarn along the center part on the top of her head and then a few more along the back.  I also used red and black beads on the ends.  GREAT Christmas hairdo, but she didn't have very many other red things to wear for the next 6 weeks, so it wasn't my favorite!


Q:  How long does the hair need to be?

A:  That is hard for me to answer personally since the first time I tried them on V her hair was already at least 6 inches long.  I think you could do them on almost any length of hair though!  You would just need about two inches of hair to get a good grip on it to start the braids.  BUT, you should keep in mind that the yarn is a bit heavy, so if you are working with shorter hair, I would stick with shorter braids, the longer the natural hair, the longer you could make the braids.

Q:  How old should my child be?

A:  This kind of goes with the length questions.  For a little one who doesn't have very long hair, I would make much shorter braids and I would start them with bigger sections of hair.  A toddler's hair is going to be a little more fragile so I would recommend using larger sections of hair to give them more of a base with less strain on the hair.  I also might not leave them in as long on a little one.

Q:  How long can you leave them in?

A:  That is totally up to you!  I have left them in up to 8 weeks.  You might find that yours start to come out sooner than that.  Or maybe yours look great, and don't smell so you want to leave them in longer!  I find that around 6 to 8 weeks, they start feeling kind of yucky and the new growth at the scalp is getting obvious so they look a bit messy.  I don't usually get many that start to slip out, but I have had a few do that towards the end.  I know other people keep yarn braids in almost year round.  They will just replace a few at a time so that they get new ones every few weeks.

Q:  What is your daily maintenance with them?

A:  I just spray her scalp with our watered down Taliah Waajid spray like I do with any style, EXCEPT, I really only spray near her scalp, not the whole length of the braid.   I know some people also wash the hair with the yarn in or at least rinse the braids.  The only hard part about this is that it takes FOREVER for the yarn to dry!  I haven't done it because I didn't feel it was necessary.

Q:  How do you take them out?

A:  This is a good question!  Some people have been able to just grab a hold of the knot at the base of the braid and just slide them out!  I wish it were that easy for me!  I normally will cut off the yarn at the bottom right up to the point that her real hair is (no sense wasting time unbraiding yarn!)  Then I unbraid her hair from the tips up to the scalp.  It takes me FOREVER and I hate it!  Although now that I have B to help me....  Last time that V had the braids though, we just happened to go swimming right about the time I was ready to take them out.  Her swim cap would not stay on her head so I just gave up and let her swim without it.  When she got out of the pool her hair was, of course, drenched!  The weight of the soaking yarn caused some of the braids to start slipping out, so I grabbed ahold and to my amazement I was able to slide it out!  YIPPEE!  I quickly set to work on her head and was able to slide most of them out.  There were a few that wouldn't budge, and I didn't want to hurt her hair so I unbraided them my usual way.  I plan on trying this again next time, but the key I think is that they need to be completely, soaking wet!  A spritz with a spray bottle is not going to do the trick.

Q:  Do you think the yarn is damaging to the hair:

A:  I have not found that yarn braids cause ANY damage to V's hair.  On the contrary, after I have taken out the braids in the past, I can see that she has had substantial hair growth while they were in and that her hair looks beautiful and healthy!

Q:  How do you put them in?

A:  That is where the videos come in handy!  The two videos makeup about 15 minutes worth of info and demonstrations so PLEASE watch them to learn how to put them in OR if you have any other questions after reading this little Q and A!  Yarn Braid Extensions Part 1 and  Yarn Braid Extensions Part 2

V really loves yarn braids and I feel like they are a great addition to her versatile choices of hairstyles.  I am not really interested in doing them that often, because we have plenty of other fun things we can do with her beautiful hair, and I don't want her to think that she needs to have extensions(or additions) to her  natural hair in order for her to be beautiful.  I am so glad that we have started doing more "free" hairstyles on her too.  I think that between, cornrows, free hair, yarn braids and the many other fun styles we do, V has learned that her hair texture has AWESOME and ENDLESS possibilities!

Here are some more pictures for you to enjoy!

These were her first ever yarn braids!  She looks so little!

Here the braids are in half pigtails.
This one shows how you can add snaps for extra decoration - This was on Valentines Day.
This was her second set of yarn braids, just held back with a headband.
You can add yarn to locs too!  We did this style on B for the first day of school last year.  I think the yarn was nice because other wise her ponytail would have been really short which would have looked funny with the big thick cornrows!


You can see that I didn't add the yarn into the cornrows, only the hanging part of the braids.  You can also see that the black yarn isn't a very good match for B's hair, but I didn't have any brown, so I just used what I had.  It still looked cute.

One of our readers sent in some AWESOME yarn braid pics which have got my fingers itching to put more yarn braids in V!  I think I will do them in October.  So you will have to wait until then to see them!

Have you tried yarn braids yet???  Have I inspired you to give them a try???

Katie


Popular Posts