Showing posts with label V. Show all posts

Thursday, November 17, 2011

Woven Cornrows and The Braided Crown


Do you remember this style?

I named it the Braided Crown.  I love it!  It was gorgeous with this puff.

But after a few days with the puff (you know I never keep a puff for long!) I needed something else to do with the center of her hair.


So I did this.

And I thought it was boring.


Well a few months ago, a friend of mine posted a pic of her daughter with the cutest style!
This is little V!  Cute girl, cute style! (my friend got this idea from the blog: chocolate hair vanilla care)


This style is different than my braided crown because it is only braided from the middle of the head out and than the crown is made with the ends of the braids.  For my crown, the hair is braided from the hairline going in. (opposite)  BUT this gave me a great idea!  IF I did this in the center of my braided crown than I could braid together the braids going from the hairline IN along with these braids that are going from the inside OUT!  

It was a fab idea!  I never did it though.  

Why?  

Because I got a different idea on the fabulous Tweeny hair blog!  WOVEN CORNROWS!!!!  So cool!  And beautifully done.  I have to admit my first attempt isn't as pretty as Rae's.  And of course, I made a demo video on my first attempt.  Plus my hubby was out of town so Miss B and I were doing the filming.  All together, it probably makes one of the worst videos I have ever done.  But, I think if you are an experienced hair braider you will get the idea :)  

And if you don't.  Well, just go read Rae's instructions!


As is typical with me, I didn't like the style as much once I did it as I did when I was imagining it.  Oh well.  It did work really well with her angel costume for Halloween!


And a few days after that I changed it up a bit by braiding the crown starting at the front, left side of her head.  One braid went around the front, the other around the back, and they met up at the bottom, right side.  We made a little bun there.  I liked this look better.


And here is the video....


Katie

Friday, November 4, 2011

How to do a Twist-Out

I have another video for you all!

After I posted a pic on facebook of V's Twist-Out I had a few questions from people about how to do a Twist-Out....so this is for you!


In the video I do not really talk about the longevity of a Twist-Out, so let me address that here.

In our experience we have never had V wear a Twist-Out for more than a day. Often we will take out a hairstyle the day before we plan to wash her hair and restyle it, so the Twist-Out is just sort of the first step in that process - her hair looks cute and we are getting a jump start on hair day!

V's Twist Out at the end of a long day.  Much less defined than when we first took them out as you can see in the video.

Because we don't use a lot of gel in our styles and I don't use any kind of setting or curling cream her Twist-Out's loose definition by the end of the first day. Each of the little sections start to puff out and expand. We also don't take any special care to preserve the style over night, other than the sleep cap she always wears. BUT if you wanted to try to preserve a Twist-Out you could either loosely band the hair in sections of maybe very loosely braid the hair in big sections over night, and don't forget a sleep cap or scarf! The next day you can than either lightly spritz and scrunch the hair, or put a bit of oil on your fingers and run it over the curls.

As the Twist-Out looses definition it will start to look more like a chunky afro which is also a really cute look and fun style! So I would say you could go with a Twist-Out for several days to a week, just realize it is going to loose definition and change it's look as time goes by.

Unfortunately, when Miss V wears styles like this she tends to get a lot of attention that she seems uncomfortable with. She is used to people commenting and raving over her beautiful hair, and when she wears big puffs she gets a lot of attention too, all of which she enjoys. But for some reason the Twist-Out (which is usually pretty big and fluffy) seems to elicit stupid comments like, "wow, look at your crazy hair" or "wild hair" "or something similarly negative in feeling no matter how nicely a person seems to say it. So I think if we ever do a Twist-Out for more than one day, we would pull it back into pigtails or something.

This is V's hair after a Braid-Out.  I guess it is big and wild, but Adorable!

Have a LOVELY day!
Katie

Wednesday, September 7, 2011

Back to School 2011 - V's Hair

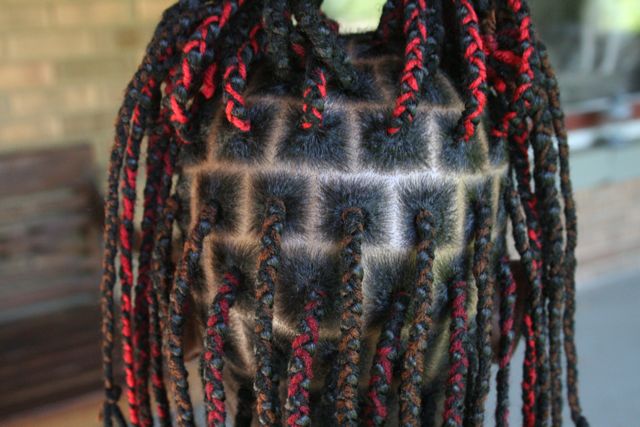
We seem to have fallen into a pattern of giving V yarn braids every fall.  She did not have them for the first day of school last year, but we did them shortly after.  I really only like to do yarn braids once a year for several reasons.  1) they take a long time to put in 2) I leave them in a long time -which is both awesome and boring 3) I just like variety so once a year makes it exciting every time she gets them!  

This year I decided to basically repeat the fall inspired colors I did last year because I REALLY loved that style, but I HAD to make some changes.  I NEVER do any style exactly the same way twice!  I will be referring to last years braids all the way through, and I won't be explaining much about how I did the style so you should check last years post before reading this one!


Change 1-  I added Red yarn.  I was going to use this last year but thought it was too bright.  This year I was ok with it!  So we had black, brown, burgundy and red.

Change 2 - No beads.  The beads were great last year, but again I like change, and it is easier to get the hair into ponytails and other styles without a clump of beads on the ends.


Change 3 - I went for longer braids.  These are the longest we have ever done.

Change 4 -We did a layered look instead of a blunt cut look.  I usually try to have all braids the same length at the bottom, so for a change I tried layers.  I am not sure it is as cool looking as I envisioned, but to achieve this look I just made the bottom rows really long and then with the rows after that I made them a bit shorter each time.


Change 5 - We did piggy back braids on top.  Last year we had criss cross cornrows.  Again, I will leave these in for a few weeks and then take them out and put more yarn braids on top while leaving the back as it is.


Change 6 - I also kind of changed the pattern in which I put in the different colors of yarn.  This time I did the colors row by row from the bottom up.  I did two black rows on the bottom and than did a burgundy row, a brown row, a red row, and back to black etc.


I think that covers all the changes.  I made some little braided yarn pieces to use as hair accessories on the pigtails.  I kind of liked them, but I got sick of them and took them out after a few days.


Lastly, if you don't know how to do piggy back braid, here is one of our original videos on how to do them!  They are a great alternative for those who can't do cornrows.  Notice that B is the hair model in this video - before locs!


Katie

Tuesday, August 23, 2011

Picture Day Puff!

Here in Michigan the kids haven't returned to school yet.  They go back the day after Labor Day.  But they did go in last week to get their school pics taken.  Due to some time constraints I had to take out V's current braids, wash her hair, and put in the new style all in the morning before going to school after lunch!  When I told V that we had to do something simple, she excitedly suggested a big puff!  Brilliant girl!  I hadn't even thought of that!

Of course just a puff isn't quite exciting enough for me, so we needed to jazz it up a bit.  I don't really stress about school pictures though because I don't buy them.  They just go in the year book.  I always take my own pictures of the kids every fall that I make prints of and give to family and friends.


As you can see.  I decided to add these little twirlies all the way around her hairline going up to the puff.  There is probably a better name for these like single stranded rolling twists or something, but I like twirlies.  After all, that is how I did them.  The hardest part of this style was parting out the puff.  Trying to make a nice round circle on a not so perfectly round head is tricky.  But after that, I just made triangleish parts, twirled each section, and stuck the ends up under the ponytail holder that was holding the puff.  Simple!


The next day I wanted to get all that free hair tucked into something more protective, still wanting to keep things simple though because it will be time to do Back-to-School hair soon.  I chose twists.  We have been doing a lot of braids lately.  I also didn't make these the rope style twists (you know the kind where you twirl the hair as you twist) I wanted these to be loose and fluffy.  Well, fluffy they are, and they are great!  I just reused the triangle parts that were already in and than sort of randomly made more triangleish parts all over.  This wasn't a meticulously planned out style.  And I LOVE it!


I am afraid with the twists being so loose they won't last long.  Although they have been in about 5 days now and are still holding up pretty well.  It is funny when a quick easy style turns out to be a favorite!

I am still undecided about how I am doing V's Back-to-School hair.  What are you all doing?


Katie

Sunday, July 31, 2011

Skip a Step

Since V only wore the 8 large cornrows for a week, I decided to skip a step with her next style and recycle those parts.  I was not yet sick of the style, it just had to be redone because it was such a mess.  So I kept it simple and just doubled the amount of braids going into the ponytail!


I have been avoiding beads this summer.  Trying to really rest her ends and gets some growth.


The 4 cornrows going up the back of her head became 8.  Similarly the 4 cornrows in the front became 8. The difference being that for every 1 cornrow I replaced it with a set of Criss-Crossing cornrows.  Well, Crissing cornrows I suppose, they don't actually Criss and then Cross.  (It's ok if you don't think I am funny.)  


The other change I made was that I took the 1 cornrow from her bang area and split it into two.  I had these two cornrows continue back into the criss-crossing ones behind it.  


If you would like to watch an OLD video of ours with the instructions on how to do Criss-Cross Cornrows, Go For It!  Miss V was quite little when we made this video and I think it is the one where she has a cold and makes a bunch of gross nosies for your listening pleasure.  This is also the one where I don't realize I was in my pajamas until I was uploading it to youtube.  Good Times.  


Katie

Thursday, July 28, 2011

Not Always Picture Perfect

Today's post is to let you all know that HAIR is NOT ALWAYS PICTURE PERFECT IN THIS HOUSE!  You all get the benefit of seeing freshly done styles, but the reality is that that only lasts so long.  And I am the queen of stretching a style.  It took me years to get comfortable with the idea, but fuzzy hairstyles are no longer my worst enemy.  I surely have occasions when I want my kids to look their best.  And I also have my moments where I find myself suddenly wishing my girls were looking a bit tidier - eek!  But for the most part, I have learned to let go of obsessively caring about what other people were thinking about my kids hair.  It's a good feeling.

So after 5 1/2 weeks with V's second set of box braids I decided to take them out because it was one of those moments where I wanted her looking her best.  We spent last weekend in Illinois visiting with family that we only see every couple of years.  I needed to do something simple due to time restraints so I went with an old favorite, 8 large cornrows into a ponytail.  Click the link to see the last time this style made a blog appearance.  The difference this time is that I wanted to show off Miss V's big beautiful puff!  So instead of braiding or twisting to the ends I only braided up to the ponytail and than banded off each cornrow.  Which I then gathered into one ponytail holder for a GIANT puff!  Gorgeous!  This is a picture perfect moment.


Our second day in Illinois was a beach day.  I was not keen on the idea of this much free hair playing at the beach.  That is why I banded off each cornrow individually.  It made it easy for me to go back and continue each cornrow into a hanging braid.  It was a pretty fast process and looked cute.  Also fun to be able to sort of show off 2 different styles in one weekend.

Now for the not so pretty part.  These bigger cornrows are only meant to last a week - TOPS!  V was pretty rough on them over the weekend, I had her wear a swim cap at the beach because I still have fears of sand and seaweed, but unfortunately I think putting the cap on and off can mess the hair up a bit.  Then she had swimming lessons on Monday, where we have NOT been using caps.  I am proud to say I am no longer afraid of water!  On top of all that I have been super sick the last few days and she has not been getting her hair sprayed daily.  So this is how V looks after a week of all that....


Thank goodness I am feeling better.  Looks like tomorrow will be hair day.


Katie

Monday, June 20, 2011

Box Braid Update

Hey friends!  Hope you all still consider me a friend even though I have been neglecting you big time!  Besides trying to squeeze in every little bit of quality time possible with my kiddos now that they are home on break, we have also had a wedding, funeral, birthday, anniversary, end of school year, soccer, soccer, and more soccer going on here the last few weeks!!!!!

I have to update you on V's box braids though because she is SO in love with them, that it finally happened.  The girl asked for locs.  Yup, she did.  She was able to put two and two together and realize that all the freedom I have been allowing her with her braids was pretty much what her sisters life is like with locs.  My reply to her was, "But wouldn't you miss your puffs and other styles?  Maybe we should give it a few more years and then think about it again?"  My powers of persuasion win again, because she thought this was a brilliant idea.  Isn't it great when your kids are still young enough to think you are SO SMART!

What we did decide to do was to keep the box braids for awhile longer!  I was going to switch to a different style and then come back to the box braids later in the summer, but I had a plan that I thought would be easier and V was so pleased to keep the braids!

I just gave her hair a really thorough washing with the first set of braids in.  Then I took out the braids a few at a time and put them back in.  I took out a few at a time because I was making them a little bit smaller this time.  So in some places where I had 2 braids, I put in 3.  Or where there were 4 braids I put in 5.  In some spots where there were really large braids I just split them in half.  But when I did this I made triangle parts this time.  Just to change things up!

The last set of braids we had in for 4 1/2 weeks.  I am hoping since these are a bit smaller I can stretch them out for 5 or 6 weeks.  At the end of the life of the braids when they are looking super fuzzy, I just keep them in french braids or pigtails and they are fine!

Here are a few pics of how we have styled the braids:

Half up French Braid

Two French Braids

With Bangs
Wavy Pig Tails (from the French Braids)

Two Cornrows into a Ponytail
Bangs only on one side


Those were all from the first set of braids.  These are the newer braids.  They have been in for almost a week now.  Last night she rinsed them in the shower and afterwards when they were wet we put them into 5 big braids to make them wavy.  From the pics it looks kind of sparse (especially in comparison to B's full locs) but in person this looks darling!  


I have a few other posts in my brain waiting to be written.  But I am making time with the kids my number 1 priority this summer!  Last summer I was going to school and I barely saw my family.  NOT GONNA HAPPEN this year!  So, please be patient.  If you don't hear from me for a bit, just know we are having a good time!


Katie

Popular Posts