Wednesday, August 11, 2010

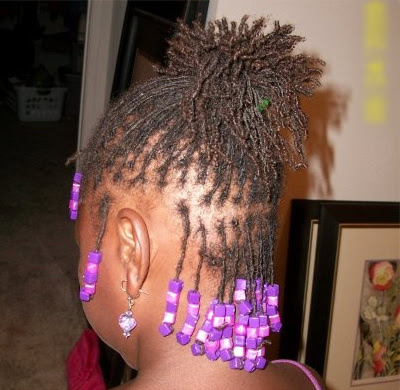
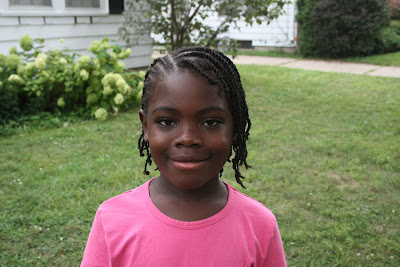
A Celebration of Hair Bling!

To accompany this weeks Snapaholics giveaway we would like to show you a few of our favorite hair bling pics!

You know how sometimes you just really love the way a bead combination comes together!  Or you look at a picture from a year ago and you think - I LOVE those colors together!  I have to do that again!  Or you are at the grocery store and you see someone else's little girl and you get some serious hair bling envy!

Maybe you are hair bling challenged?  You can never quite figure out what hair accessories to match with other accessories.  You have tackle boxes full of bling and you don't know what to do with them!  Maybe some days you know exactly what to do, but other days you find yourself scouring the internet for some good blingy photos to help you out?

Well, we are going to look back through some of our old photos and share some hair bling inspiration with you!

These are pretty old pics - how cute is my baby V!

We use A LOT of pink and purple hair accessories because they match most everything the girls wear.

So I really love to change it up once in awhile and I think the BLUE is really cute!  And actually quite versatile as it will match anything with jeans.

These braids are ended with star snaps I got from Snapaholics!

Look at how short V's ponytail is!

I have always loved how dark colors like this pretty purple look on V's hair.  They stand out so beautifully against her dark hair!

This purple bead mix with matching purple heart ponies were also all purchased from Snapaholics!


This is one of B's very first styles.

Don't you love how cute it is with the pastel flower beads in between each section of the piggyback braids!  

Here is a picture of G with piggyback braids with heart beads in between.

Steph - Did you get this idea from me?

(Steph here: yer darn right I did Katie!)

For added length and color Steph also has some yarn falls ballied in there...she will be doing a post about how to make these!

I like the black snaps at the bottom, they are understated and let the colorful hearts stand out!

Here is a cornrow ponytail on B before she had locs!  

The only beads are on that cornrow across the front.  But my FAVORITE part is the princess like ponytail holder around her little puff!

Don't you think Steph should carry those???


One summer V had a very large amount of pink and orange clothes.  So I came up with a number of pink/orange bead combos.  And I LOVED it!  I think those colors are so bright and summery!


Doesn't it kind of remind you of candy?


Here is a typical pink and purple combination.  

This was an Easter hairstyle.  The pink and purple flower beads matched her Easter dress perfectly!

What do you do for holidays?  I often coordinate my styles to go with the season/holiday.  

One Christmas I gave the girls matching styles, but with different bead combinations.  The different beads matched their Christmas outfits of course!  


V was wearing the Green and Red combo.  And this is B with the Red and White. 
The Style was piggyback braids on top with box braids in the back.  But the COOL part was the piggyback headband going across the top!  I love the red and green flowers!


WHOA!  Look how much V's hair grew!  And this picture is probably a year old!

Do you like to use A LOT of beads or just A LITTLE?  

This is probably about the most beads per braid I will do. I see lots of little girls out and about with beads going all the way up the braid, but that's not my style.  I like to see more of my girls pretty hair!  

How do you feel about rainbow style beads?

I like them!  These are pastel colors.  I like rainbows with bright colors also.

I know you can't really see V's hair in this pic, but that's ok because this post is all about the bling!

Just had to add this picture with my square beads from Snapaholics because they are SO cool!

I also feel like the square beads have a very slightly larger hole than regular ponies.  I seem to be able to slide them over the rubber bands easier.

Looks like I have matching flower beads on the ends of these braids.  And you guessed it!  I bought those from Steph too!


-------------------------------------------------------------------------------------------------------------------------
So time for some G shots. As you know from G's Story Chapters 1 and 2, I have frequently been guilty of overblinging. It's a disease, I tell you. But sometimes I feel like I hit the mark! If only her hair had been longer!

Katie already posted one of my crazy favorites above, the yarn falls with black and rainbow colors, with hearts in the piggy back braids. Loved it! And just because her face is so darn cute, here's the front shot of that hairstyle:


Despite her shorter hair in back, I really liked this style. Part of the reason was the triangle parts I made, but part was i just loved how the butterflies and barrell beads set each other off. Alas, I look back now and say "too many beads!" I should have gone for 3 per braid instead of 5!

This also illustrates something important about the oft-overlooked Style #3 snaps, the black flowers. When you want the focus to be on the bead pattern, choose a plain black snap. It is very understated and the beads stand out more.


This is the front and back of the same style. I loved the rich bright color of these beads set off by the plain white heart snap. And I ADORE G's attitude in the front shot! This is one of my favorite photos of her. If you notice the single red heart bead in the back, a fun thing to do (I got this from my friend Michelle in Minnesota) is place one single red heart bead somewhere in each hairstyle, meaning that this style was done with love. I think that is a great little idea!


I think my signature style seems to have been puffs with three bangs! In these two photos, I loved the color combination and how they matched her dress. These are the square flower sheen beads and I had cube ballies in the top photo. The bottom photo are the pastel starflowers, and I happened to have a set of mini ballies in the same three colors, so I put three ballies in each puff. Matched great! This is also a very easy way to change bling every day to match outfits. Puffs and a few bangs with bling.
(Katie Here:  I can't resist telling you how much I LOVE this white dress!  I am kind of scared of white clothes on my wild kids, but this is beautiful!)


This was G's first grade photo hairstyle. If you haven't tried cubes yet, they give a whole different look to the hair. I LOVED this one, and the way all those beads sounded together. When I did this style, I had not put lots of beads in for awhile, so I missed that clicky clacky sound!

Another fave. And no, I don't carry these at Snapaholics! :)


Now we want your help!  We know you have plenty of good ideas out there.  Inspire us!  Please email your favorite hair bling pictures to keepmecurly@gmail.com and we will put together a post of all of YOUR pictures!

Tuesday, August 10, 2010

Tidbit Tuesday

Put An End To Bed Head!!!
So I am not sure if this is going to be a really helpful tidbit or not! But I had noticed at some point that I have a very specific way of putting B's sleep cap on at bedtime. I also noticed that when I put her cap on she has little to no bed head in the morning, but if B or Dad put her cap on we can have some CRAZY bed head!

So I made a quick little video demo of how I put B's sleep cap on. This may mostly be helpful for those with locs, but, come to think of it, I put V's cap on the same way. It probably is good for any hairstyle! It's just that with cornrows, V doesn't often have bed head! Although, V's current style of box twists operate pretty much the same way locs do - so this sleep cap technique comes in handy.

As a side note: I have no idea why B looks like her eyes are going to pop out of her head in this video! We were giggling about something right before we started taping and Camera Guy and I always say, "Ok, be serious now. Well, it's ok to smile!" If we don't tell the girls they can smile they look SO serious and then I get youtube comments about how miserable my girls look! But they are just trying to sit nice and quiet which takes a lot of concentration for them! lol! Anyway, so I guess, on this day, reminding B to smile gave us this very fake, plastered on expression! Kids!


Do you put your kids sleep caps on for them or do they do it themselves?


Katie

Monday, August 9, 2010

GIVEAWAY!! - Snapaholics Hair Bling

I'm sure you all were wondering how long it would be before we had a Snapaholics Hair Bling giveaway at Keep Me Curly, weren't you?

Well, the time has come! Two readers will win $15 in free hair bling, with free shipping included. Your choice of items (beads, snaps, barrettes, ballies). If there is something that I am nearly out of and need it to fill already-placed orders, I will let you know.

I probably don't need to tell anyone who reads this blog how much fun it is to put hair beads, snaps, and other cute items into your child's hair style!

I also probably don't need to mention that some people have huge fishing tackle boxes full of this stuff.

Or that missing a certain color shade in your perfect rainbow of bead bins can make you start to twitch uncontrollably.

Or that the skill required to perfectly match outfits and hair bling on a daily basis rivals that of most Olympic Sports...

If you don't have firsthand knowledge of these things, then ENTER TO WIN our giveaway! If you don't win, fear not. Everything to satisfy your cravings for hair bling (or start them, if you're new to this) can be found at Snapaholics.com!!

The contest is open now and will close on Friday, August 13th at midnight EST!!!!!

To enter please leave a comment on THIS post and answer THIS question:
Go to Snapaholics.com and check out all the fabulous hair bling. Then post a comment to THIS post about which items you like and what style you'd do with them...which beads, what kind of style, and then how you'd finish off the braid/twist, with which snaps or finish with a bead or barrette?! (And don't be surprised if we might borrow your ideas LOL)
____________________________________________________________________

If you would like to earn EXTRA entries do one or all of these things:
1) Head on over to our Keep Me Curly! Facebook fan page and become a fan. Leave a comment stating that you are a fan. (or that you already were a fan)
2) "Share" our Keep Me Curly! Facebook page with your friends and come back and leave a comment letting us know what day you "shared" us THIS week.
3) Follow @keepmecurly on twitter Come back and post a comment that you are a follower and leave your Twitter ID. (or that you were already following)
4) Tweet any unique tweet announcing our blog or the giveaway with @keepmecurly in it! Cut and paste your tweet (not tweet id status) and post as a comment. You can get 1 entry for EVERY new and unique tweet!
5) Become a follower of our blog or subscribe to our blog through an RSS feed. Simply post a comment saying that you are a follower. (or that you were already following)
6) Subscribe to Katie's youtube channel and come back and leave a comment stating that you are a subscriber. (or that you were already a subscriber)
7) Leave a comment on one of Katie's youtube videos. Leave a comment HERE letting us know the title of the video you commented on.
8) Go to Steph's Snapaholics website and leave a note in her guestbook. Come back and leave a comment HERE letting us know that you signed the guestbook.
9) Place an order at Snapaholics between 8/9 and 8/13 Noon EST. Leave a comment including your order number and order date.
10) Grab our badge! If you add our badge to your blog leave us a comment saying that you are using it with a link to your blog.
11) Advertise our site or this giveaway in a forum or other blog! We would really love it if you wrote about our site or this giveaway on your blog. If you are passionate about natural hair care, or Katie's youtube videos have been really helpful to you, or if you love cute hair things, talk it up on your blog! Earn TWO entries for doing this one! Simply post a comment saying that you are talking about us with a link to the forum or blog, then put (first entry) then comment again and write (second entry).
12) Get a friend to talk about us or our giveaway on THEIR blog, earn two MORE entries! Just leave us a comment with a link to THEIR blog and tell us that you encouraged them to participate. Then make sure they enter the giveaway for themselves too!
________________________________________________________________________

The winners will be announced on Saturday, August 14th. It is the responsibility of the winners to contact us at keepmecurly@gmail.com to let us know their mailing address. IF the winners do not contact us by Friday, August 21st, we will choose new winners.

Who can participate? Anyone! Non-US residents are welcome to participate BUT will be required to pay 1/2 of the shipping cost if they win.

*** If you have any questions or if you have comments that are not related to the giveaway please feel free to email us at keepmecurly@gmail.com or leave your comment on yesterdays post. In order for this giveaway to work we have to ask that you do not leave any other comments on this post if they do not follow the guidelines of the contest.***

***Also make sure you leave a SEPARATE comment for EACH thing that you do. Every comment will be assigned a number and an online generator will choose the winners from those numbers. The more things you do, the more comments you can leave and the more chances you have to win.***


Saturday, August 7, 2010

G's Latest Style - Simple Big Cornrows ALSO Link to a Boy's Locs Post

We were just having a conversation on the Yahoo Hair and Skin Care group about Locs....to Loc or not to Loc, that was the question. :)

As I mentioned in a previous post in G's Story, I never did many cornrows on her before her locs. I do regret it now. They cramped my hand but I think I just needed to relax a little and practice more, and wait for her hair to grow out more in the back. Once we did locs I reveled in putting in lots of easy ponytails and letting her wear her hair down or with just a head band.

But now, I find I really CAN cornrow, and I can still cornrow the locs! As I also mentioned previously, G's hair is not super dense and thick. So when they are freshly tightened her locs can show a lot of scalp. When her hair is hanging down this doesn't show so much. I really have been wanting to "STYLE" her hair more even with the locs. Starting this website and seeing so many of the inspiration sites has...inspired me! I have even been inspired to start braiding my hair just for fun (I had been using sunglasses as a head band at work for a number of months...LOL...I don't spend any time on my own hair, really.) I think I might even grow it out and turn bohemian and just start braiding it all over the place!
It's looking pretty spiffy with those three colors in there....growin' out light blonde, natural color dark blonde, and "i-turned-40-and-here-comes-the-gray" gray! Can you see it there sprouting at my temples? Fun!

So, back to G. It's actually a lot easier to cornrow locs because you don't have to separate all the curly hair sections. You just grab locs and go!

I probably could have made this much more intricate but we seem to be always pressed for time, or I've been doing her hair and it's way beyond bedtime.


What is really fun about cornrowing locs is that they are so FAT! Even thought her locs are not so fat, all together they make the 'rows really chunky.

She told me she got compliments on her fatty 'rows at day care yesterday :)

I am also really enjoying the sun-and-pool bleached tips her locs have. Check this out!
Before anyone worries, we do rinse and condition WELL and her locs are healthy! It's just a little lightening. Her sister in France has naturally lighter pigmentation in her hair, always has, so there may be a genetic factor. I am thinking that this is lightening above the norm for sun and swimming?!

So don't be afraid of locs if you love to style...there is PLENTY you can do! If you are new to our site, watch Katie's "Loc Styles" Video for excellent inspiration! And of course as the kids get older, there is lots of loc jewelry you can get...Phyllis the Video Locktician makes loc jewelry which is really cute.

For tons of info on loc care, watch Katie's series of  videos here. Also, an EXCELLENT post on locs for boys is by another adoptive mom with identical twins from Haiti. They have moved their blog and it's now private, but here's a post from 2007 when the boys were maybe 4 or 5? It is a very comprehensive post.

TTYL!

Thursday, August 5, 2010

Twists, Twists and More Twists (and Cornrows!)

Our family is headed out for the weekend!  We are going on a road trip with my husbands family to the Zoo and the Children's Museum and another Mystery Destination!  We are quite excited, as we don't go on many trips or vacations!!!

I spent most of the day yesterday doing V's hair to prepare for the trip.  My fingers are still aching!  I put in quite a lot of two strand twists and a few cornrows in the front.  I was inspired by a picture on the Hair With Purpose Blog.  Again, my style ended up different from hers, but seeing this picture got my creative juices flowing.

Not to make the style sound more exciting than it is.  Mostly it is just twists.  Why don't I show you?!?!


The inspiration style, I believe, was all twists with just 3 cornrows going toward the back on one side.  I ended up doing 4 cornrows on the side, but I wish I had done 3 because I really like how the inspiration style is parted so far to the left and sweeps over to the right side.  Maybe next time!


Another change I made was to put a few cornrows going sideways over her head to the right.  For added interest I made the cornrows progressively longer.


The back of this style is just two strand twists.  I decided to do the rope style twists hoping that they would last longer without getting fuzzy.  Rope style twists look cool, but I normally prefer regular twists because they are fluffier and make the hair look more full.

This is actually a style that will look better after a day or two.  It looks kind of stringy right now but it will fluff up a bit over time.  Maybe I will get some good pics on our little trip and post them for you all to see!
There isn't much else to say about this style.  Here are few different angles:


I am hoping this will look really nice for at least two weeks.  I used my Taliah Waajid gel in hopes of getting extra hold.  I might add a flower clip or two on the right side for some color.  After a few weeks if it starts looking messy I will put it into pigtails or something cute and make it last another week or two!

V's opinion of this style:  "It's comfortable and me and B look like twins!"

*Yes, this is also a GREAT bike helmet and swim cap style!  Which is perfect for a weekend of swimming in a hotel pool!*

I hope you all have a really lovely weekend!  Steph will be holding down the fort while I am gone.  Be sure to pay attention because we might just have another giveaway coming up soon!!!!  


For styles like this, do you prefer box braids or box twists?

Katie

Wednesday, August 4, 2010

Bike Helmets, Swim Caps and Summer Styles, OH MY!

This is a real summer time post!  For those of you who live in warmer climates this may not apply to you as much.  But here in Michigan, my girls really only have 3 months in the year that they spend A LOT of time riding bikes and swimming.  They do these things at other times of the year, but not with enough frequency that it causes me to choose hairstyles to accommodate them.

Bike Helmets


I am a bit of a stickler for wearing bicycle helmets.  We all wear them.  For most of us our hair doesn't usually interfere with our ability to get a good, comfortable fit with our helmet.  If B or Little E have some kind of style that gets in the way we can easily take it out and put it back in later.  Not so for Miss V!  Most of her styles stay in for 3 to 4 weeks so it is important for me to keep that in mind when planning her summer styles.


Certain hairstyles just simply will not fit under a bike helmet.  Mainly things that stick out of the sides of the head like this:

As cute as pigtails in the summer would be, I try to avoid them.  Especially ones with lots of beads and bobbles on them.

V's current "free hair" pigtail puffs will work under a helmet even though they stick out the sides of her head, because the free hair will squish down easily. They will look pretty mashed up afterwards, but that is easy enough to fix.  Also, since I only plan to leave that style in for a week it's not a big deal.


Ponytails with lots of beads and bobbles would also be a bit difficult but slightly easier than those high pigtails.  Even easier -  a ponytail with no hair accessories like this:


Remember the last in between style we had?  V had a bit of trouble getting her helmet on with this one too.  But she can deal with that on styles that are only in for a day or two.  

On the other hand, with her cornrow styles that stay in for 3 to 4 weeks, I really try to give her something that isn't going to frustrate her and drive her crazy!  Because she really likes to ride her bike!


 The BEST hair choices for under bike helmets are styles that go into low pigtails or ponytails or cornrows that just go straight down, like these:


So to wrap it up ---> just think the less bling the better (sorry Steph!) and keep the hair as flat to the head as possible.

Swim Caps


I am also a bit of a stickler for wearing swim caps, but this is a bit more dependent on the situation.  We really don't do all that much swimming.  We don't have a pool or have friends with a pool, we don't live on a lake and we only make it to the beach a few times a year.  If we swam more regularly I might rethink my strategies, but for our purposes this is what works for us!  

If we are swimming in a pool with chlorine I have both girls wear swim caps to avoid the chemicals causing damage to their hair.  I know that some people will load the hair up with conditioner before going in the pool and then rinse, rinse, rinse afterwards, so that is an option.  I have also read that if you get the hair thoroughly wet before hand it won't be able to soak up the chlorinated water.  We have gone in pools without caps on occasion, but most of the time they wear them.

In a lake I like to have them both wear caps because I can't help in-visioning all this yucky seaweed and lake gunk getting trapped in B's locs!  And with V, I normally don't have her get her hair wet at all while her cornrows are in anyway.  Also, a big plus to wearing swim caps at the beach is protection from the sand!  If you have ever had to deal with sand getting in your child's hair you know what I am talking about!  With super curly hair the sand tends to get trapped on the scalp and it is REALLY difficult to get rid of!  As you can see in the picture above, the swim caps are not hindering my girls ability to have fun, so for now, this routine is working out. 

If we are just playing around the yard in the sprinkler or kiddie pool at home I am much more relaxed.  B never wears a cap and I will let V go without one if we are in the last week of her wearing her current style.  

Now the rules for good swim cap styles differ slightly from the bike helmet rules, so that makes things a bit tricky.  

With swim caps it is even MORE important to avoid a lot of hair bling.  This style is a pretty good choice.  I would probably just remove the ballie before putting on the cap.  

The reason being that big clips, barrettes, ballies or excessive beads will cause strain to the cap and might put tears or holes in it.  


This is probably a little too much:


For swim caps, hair that hangs down long is actually a little harder to get tucked up into the cap so ponytails work great.  Most caps have extra room right on the top of the head, so if you can pile all the hair up there it will make it a lot easier to get the cap on!  

This would be a perfect style.  

*Notice that this is the same type of style that was a pretty good choice for bike helmets, making it probably the BEST choice for working well with BOTH*


Another style that I have found out WILL NOT WORK with our swim caps are yarn braids!

This is just too much hair to fit inside the cap!  I believe the caps we own are youth size and my girls already have slightly large heads, so add all that yarn and hair and it's just not gonna work!  You might be able to get the cap on, but as soon as she jumps in the water it will pop off!


Putting swim caps on girls with locs is pretty simple.  You really don't need to do anything special, but putting the hair up in a ponytail will make it easier. 


 I am adding a video to this post to show HOW to put on a swim cap so you can see what I mean.


Do you prefer to use swim caps, or go without?

Katie

Tuesday, August 3, 2010

Tidbit Tuesday

What is the single best thing to ever happen to the world of afro haircare?

(ok, In My Humble Opinion, since we have locs)

Well, I'll tell ya. And it took me three years to figure it out and get one:


Yep. For about 15 bucks at your local big box or hardware store, you too can have this marvel in your shower. It installs in about 2 minutes.

Steps:

  • Unscrew old shower head
  • Screw in new shower head
  • Rinse hair as you never have before
  • Kiss and hug new shower head and whisper to it, "thank you!"
Since we have locs here, I was always wanting to make sure we R.I.N.S.E.D. very well. What I have heard is that you should Rinse, Rinse, Rinse. Then when you are done, Rinse again because you are not done Rinsing. It goes for all super-curly hair. I took to having a small bucket in the shower that I would fill up and then dump directly on her head a few times. Yeah, ok, but kinda clunky.

When we went through our bout of Holy Buildup Batman, I didn't have one of these. When I would squoosh the buildup out of her locs, I just kind of held it in the path of the shower stream and kept soaping up and squeezing, hoping it would wash away enough of the stuff. But NOW.....

Enter the handheld shower head. You can HOLD IT RIGHT UP TO THE HAIR, RIGHT WHERE YOU WANT IT! And with several spray settings, including the "massage" setting that also serves to nearly BLAST stuff out of the hair. Me Likey!!! I think it also feels good on her scalp. I really can't imagine what it's like to have hair constantly up in styles all the time, pulled tight and braided and whatnot. The shower massage on the head has GOTTA feel good.

So run, don't walk, and get yourself this goodie for your shower. You won't regret it. 

Oh and it has also saved my back when we wash G's "little brother!"


Course that's not me! You didn't think I'd show you a photo of the inside of my shower did ya? Although that DOES look very much like our Tiga:


What is one item that YOU find absolutely critical in your hair routine?

Sunday, August 1, 2010

Help with Hair Time!

Please excuse our pajama's!
I am so excited to share with you that I finally have HELP with hair time!  With three little girls I often have my hands full caring for everyones hair.  Well, technically, I also do my sons hair and occasionally help with my hubby's hair when he buzzes it and needs to be cleaned up around the edges.  You can see, these hands are busy!

In the past I've given B and V some small tasks to help with hair time.  The most important one was that whoever WASN'T getting their hair done would occupy the baby.  Now that little E is getting older that isn't as important, but it was a BIG deal for awhile!  They also have helped thread beads onto beaders, which they LOVE to do.  But that is probably the extent of their ability to help.  Camera Guy isn't really into helping with hair time, but I always get him to cut yarn for me when I do yarn braids!  And he also is really great about making dinner or changing diapers or whatever else needs to be done when I am elbow deep in hair!

Recently I decided that B was getting old enough to start learning how to work with hair.  Of course, she can already braid, she practices making up hairstyles on dolls, barbies and ME!  But she has never gotten her hands involved in styling V's hair.  I realized it was time for me to let go of some of my "control" issues and start teaching B.  She is likely to have girls of her own one day, and she's gonna need to know this stuff!

I was a little worried about her ability to be SUPER gentle, and I am very protective of my girls hair.  I have been gently nurturing it for years now, and I didn't want B to get in there and start ripping through tangles.  But she was surprisingly gentle!  Maybe it is the empathy factor, as she knows what it feels like to be the one in the chair.  But she is not normally that careful with her dolls hair!  It was really great to teach her how to gently work through tangled areas. It just felt like such an important moment  - mom passing things down to her daughter.  Kind of a "coming of age" moment.

I have to admit I am a baby steps kind of person.  So I only had her help me take out V's style.  She was pretty slow.  She got one braid/cornrow taken out for about every 3 I took out.  But in the end that meant 7 braids that I didn't have to take out myself!  That had to have cut at least 30 minutes off my time!  Now that's AWESOME!  I will certainly continue to have her assist me in taking out styles and maybe some day she will be so good at it that I can have her do it by herself and then I can step in to wash and style!

As she gets older I will start teaching her how to put the styles in also.  I can teach her all about what products to use and when, and why we need to be careful with the fragile hair line, and, well, basically everything I am sharing with you!  But remember, baby steps!


Do you have older girls that help with younger sisters? Have they shown interest in learning to style? How do you impart your knowledge on to the "next generation?"

Katie

Popular Posts